How to Make a Book Using Word: A Step-by-Step Guide
You've got a draft open, a blank document, or a half-finished idea that keeps changing shape every time you fix the first chapter. Microsoft Word can absolutely carry a book project a long way, but only if you set it up like a book from the start, not like a long memo with page numbers added at the end.
The fastest way to avoid rework is to think in three milestones: clean structure, print-ready page setup, and a clean export. That template-first mindset matters because the file becomes easier to revise, easier to proofread, and far less likely to break when you add or remove chapters. If you also need a practical tool for repurposing a finished manuscript into other formats later, the ShortGenius AI ad generator is a useful side resource for writers who want to turn book ideas into marketing assets without starting from scratch.
Table of Contents
- What You Need Before You Start Formatting
- Setting Up Page Size, Margins, and Gutter
- Building Chapter Structure With Styles and Section Breaks
- Adding Headers, Footers, and Page Numbers
- Creating the Table of Contents and Front Matter
- Exporting to PDF and EPUB Without Breaking the Layout
- When Word Stops Being Enough and a Platform Like Storyloft Helps
What You Need Before You Start Formatting
Start with the file you have
A first-time author often wants to jump straight into margins and page numbers, but the better starting point is the file itself. A draft that is still changing needs a different setup from a manuscript that is already clean. A blank document needs a plan before it needs polish.
Save a master copy before you change layout. If you start testing chapter styles, section breaks, or page settings and the document begins to drift, you still need one version you can trust. That template-first habit keeps Word work organized, while a file built on guesses usually turns into repair work later.
Practical rule: build the document so it can grow. If it only works while nothing changes, it is fragile.
Know what Word handles well
Word is strong for drafting, basic editing, and setting up a book-style page. Microsoft's booklet workflow shows how to turn a document into a booklet through Layout > Margins > Custom Margins, where Multiple pages: Book fold changes the orientation and sets the final booklet size to one half of the selected paper size, with duplex printing support and a recommendation to Flip pages on short edge for the back side of the pages Microsoft support. For short books, chapbooks, and proof copies, that gives you a workable foundation.
Word also helps you check whether the text reads cleanly. Microsoft's readability guidance shows that the desktop version includes Document stats and Readability Statistics, while the web version shows fewer stats, so the desktop app is the better choice if you want to review clarity without leaving the manuscript Microsoft Word readability guidance. If you are moving a draft from a phone into a printable file, a Word to PDF on iPhone guide can help you get the file into the next stage without losing time on device changes.
Word still has limits. It can manage text structure well, but once you need reliable print decisions, repeated layout checks, or a smoother path from manuscript to final output, authors often start looking at an all-in-one platform instead of trying to force Word to do every job alone. A good example is the way margin math can become a hidden source of layout errors, which is why a book interior margin and gutter guide for KDP paperback files can be useful before you commit to a layout.
Decide your first destination
Before you touch styles, decide whether the book is going to print, ebook, or both first. That choice changes how careful you need to be with page breaks, section breaks, and images. A print-first file can live with fixed pages. An ebook-first file needs cleaner structure and fewer layout tricks.
A solid starting document also needs consistent body text, chapter headings, and page-number logic. That is the point where Word can either act like a book tool or stay closer to a long essay editor. The difference comes from the template you build before the manuscript fills in. If you are also preparing launch assets, a ShortGenius AI ad generator can handle the promotional side while you keep the book file focused on the interior.
Setting Up Page Size, Margins, and Gutter
Choose the page size first
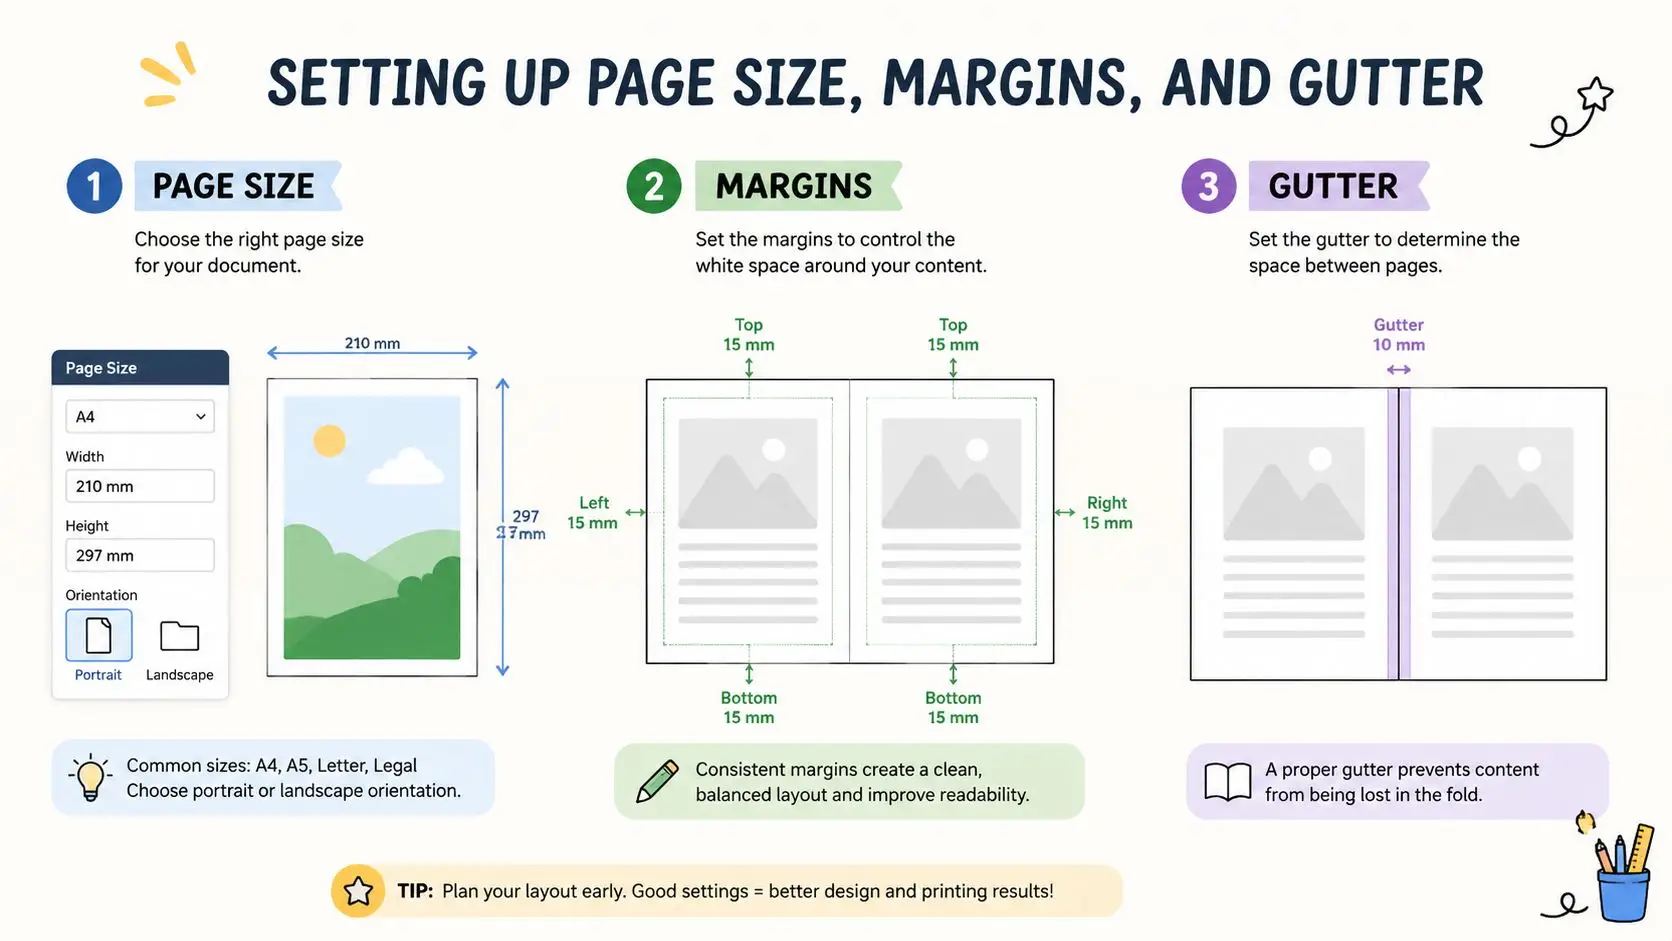
Open Layout > Size and pick the trim size you want the interior to match. For book interiors, 8.5" × 11" is a technically sound manuscript setup, with 1-inch margins and 0.5-inch first-line paragraph indents as a common baseline for clean formatting PickFu guide. If you're preparing a paperback, many authors choose a smaller trim size for the final edition, but the document still needs to be consistent from top to bottom.
The page size matters because it changes line length, page count, and how your chapters feel on the page. A larger sheet can make the manuscript look roomy. A tighter trim size can make text density feel more like a finished book.
Set margins and gutter together
Go to Layout > Margins > Custom Margins and set your inside and outside margins. The gutter is the extra inner space reserved so text doesn't disappear into the binding, and Microsoft's booklet workflow explicitly calls out the need to increase it for binding Microsoft support. If the gutter is too small, the inner edge of the page can feel cramped after printing.
When the book will be printed double-sided, mirror the margins so left and right pages alternate correctly. That keeps the inner and outer spacing balanced across facing pages. If your printer supports duplex output, use the setting Word recommends for short-edge flipping so the back side doesn't end up upside down Microsoft support.
Practical rule: if the book will be bound, always think about the inner edge first. That's where layout errors become visible.
Add bleed only when the design needs it
Bleed matters when an image or background color is meant to reach the edge of the page after trimming. If your book is mostly text, you usually don't need to add extra complexity just for bleed. If you do need edge-to-edge art, use the printer's required setup and keep the artwork aligned carefully.
For margin and gutter math, the KDP paperback margin and gutter calculation guide is a helpful companion when you're checking a print interior against a platform's requirements. Trade paperbacks and mass-market paperbacks don't use the same assumptions, so the trim size you choose should fit the final format, not just look reasonable on screen.
Building Chapter Structure With Styles and Section Breaks
Use styles, not manual formatting
Chapter titles, section headings, and body text need to be styled, not just made bigger or bolder by hand. Use Heading 1 for chapter titles and Heading 2 for sub-sections so Word can understand the document structure. That's what powers a reliable Table of Contents later and keeps ebook exports easier to browse PickFu guide.
If you only format by eye, every revision becomes a cleanup project. Styles give you one control point for the whole manuscript, so when you decide chapter titles should look different, you change the style once instead of chasing the change through every page.
Separate chapters with page breaks
Insert a page break at the end of each chapter so a new chapter starts on a fresh page. Don't use a pile of Enter keys to push text downward, because that creates drift the moment you edit earlier pages. Word treats page breaks as structure, while blank lines are just temporary spacing.
A good chapter layout often includes a chapter title page, then the chapter text begins below it or on the next page depending on your design. If you want a simple internal system, keep the title page style consistent across the manuscript so readers feel a rhythm instead of random formatting.
Use section breaks for different rules
Section breaks do different work from page breaks. Use them when the front matter, main text, and back matter need separate page-number rules or different header and footer behavior. That's where Link to Previous becomes important, because it lets each section keep its own formatting without inheriting everything from the last one BarkerBooks.
Section logic matters: page breaks move content. Section breaks change rules.
For a deeper overview of how book parts fit together, the sections of a book reference helps when you're deciding where front matter ends and chapter text begins. That structure is what keeps Word files maintainable once the manuscript starts getting longer.
Adding Headers, Footers, and Page Numbers
Make the running page elements behave
Open Insert > Header or Insert > Footer and decide what should repeat across the book. Many books use a running header with the book title on one side and the chapter title on the other, plus page numbers in the footer. Word can do this cleanly, but only if the sections are set up correctly.
If you want different behavior between the front matter and the main text, create separate sections first. Then turn off Link to Previous in the header and footer areas so the new section doesn't inherit the old rules. That's the most common place where first-time authors get stuck, because they change the header in one part of the book and every page updates in ways they didn't expect.
Handle first pages and alternating pages
Use Different First Page when chapter-opening pages should have no running header or a cleaner look. You can also use Different Odd & Even Pages so left-hand and right-hand pages can carry different header text. That's useful when a chapter title belongs on the right-hand page and the book title belongs on the left.
Page numbers should usually restart in the main body after the front matter. The front matter often uses lowercase Roman numerals, then the main text restarts at Arabic 1. If you keep everything in one section, that reset gets messy quickly, which is why section breaks are doing the important work here.
Keep special pages clean
Dedications, epigraphs, and some title pages often look better without page numbers at all. A clean manuscript needs those exceptions. The easiest way to handle them is to place them in their own section and then suppress the header or footer for that section instead of trying to force one universal rule.
A book feels more finished when the page furniture disappears into the design. Readers notice when page numbers are wrong, but they stop noticing them when they're right.
For writers who also repurpose book passages into short-form content, the content repurposing guide is useful context for thinking about how a manuscript can later fuel marketing, summaries, or launch assets without changing the core text. That doesn't change the book layout, but it helps authors plan beyond the interior pages.
Creating the Table of Contents and Front Matter
A first-time author often wants to build the Table of Contents right away, but the cleaner path is to get the front matter in place first. Open with the title page, then add the copyright page, then any dedication, epigraph, or foreword you plan to include. If those pages will sit before the main text, they need their own section setup so page numbering can change later without disturbing the rest of the book.
The front matter is small, but it still needs to be treated like part of the book, not like leftover space. A copyright page does not need decoration. It needs the right information in the right place. The same is true for the rest of the opening pages, which should feel deliberate rather than inserted at the last minute.
Generate the TOC from styles
Use Insert > Table of Contents > Custom and let Word pull chapter titles from your heading styles instead of typing the contents by hand. That setup matters because the Table of Contents updates when chapter titles move during revision. A manual TOC is like copying directions onto a sticky note, then hoping nothing changes before print.
Word handles this part well as long as your heading styles are consistent. If Heading 1 marks chapters and Heading 2 marks sub-sections, Word can build a clean contents page without extra work. Sub-headings can appear in the TOC if you want them to, but many print books keep the contents focused on chapter-level entries. Front matter entries are usually left out unless you have a clear editorial reason to show them, and that keeps the opening pages easy to scan.
Run a final check before export
Before you export, use Word's Editor pane to review spelling, grammar, and readability stats in the desktop app. The desktop version shows more detail than the web version, which makes it a useful last pass before the file leaves Word. You are not just fixing typos. You are checking whether the manuscript still reads like one book from beginning to end.
If you are comparing your setup with a traditional publisher's opening pages, the front and back matter templates guide is a practical reference point. For readers working from a phone, the Word to PDF on iPhone guide can help you understand the export step in a mobile workflow. A strong front matter file stays quiet on the page and does its job.
Exporting to PDF and EPUB Without Breaking the Layout
Choose the right export path
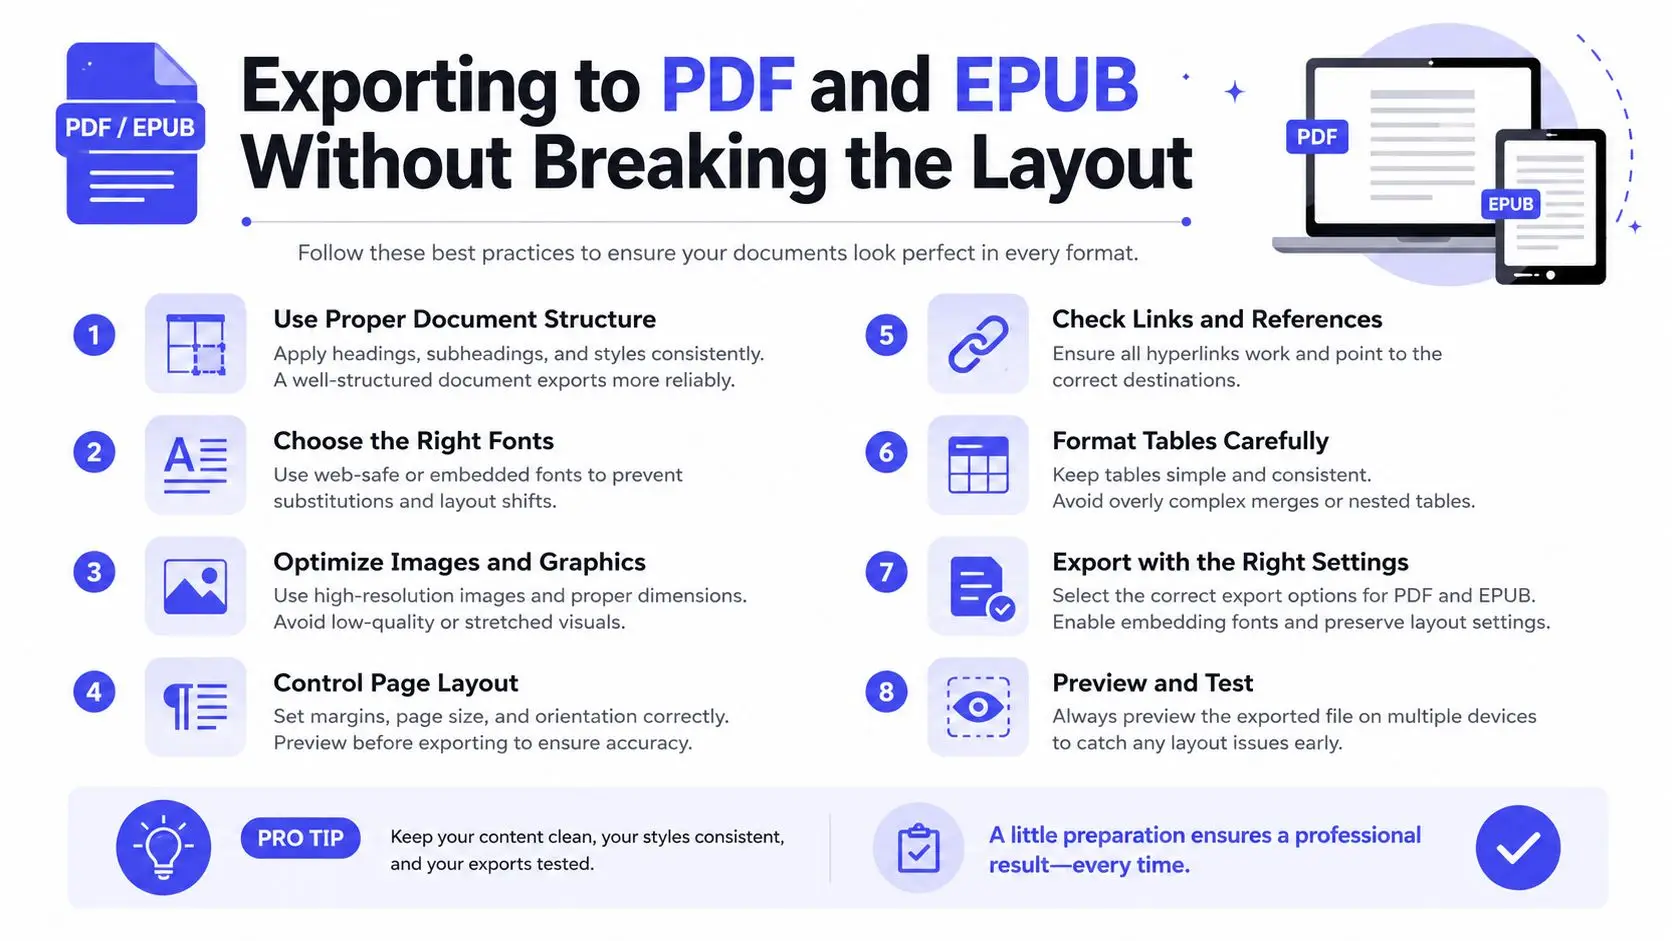
Start with the file type that matches the job. For print, Word's PDF export is the safer route because it preserves the page setup you have already built, including chapter breaks, margins, and any booklet-style layout. Use File > Save As > PDF or File > Export > Create PDF/XPS when you are ready to make a proof copy or send an interior file to print. If your manuscript uses duplex printing, mirror margins, or a booklet setup, handle those settings before export so Word is not trying to guess the layout at the last minute.
EPUB is a different kind of test. Word can export to EPUB, but ebook readers do not read a page the way a printer does, so anything that depends on fixed placement can shift or fall apart. Clean styles matter more here than visual tricks. If the chapter structure is tidy, the export usually has a much better chance of holding together.
Check the usual failure points
The layout problems that show up most often are the ones Word can hide on screen. Floating text boxes, loose images, and manual spacing can all look fine in the document view, then shift once the file is exported or opened in another reader. A book manuscript is easier to control when the structure does the work, not a series of one-off fixes.
Images need a steady anchor, and captions should stay attached to the figure they explain. If an image can drift, it probably will. For a quick mobile check, the Word to PDF on iPhone guide can help you inspect a draft without waiting until you are back at a desktop.
Know where Word is weaker
Word is good at plain interiors and simple export jobs. It is less comfortable with books that rely on sidebars, layered elements, or heavy illustration work, because those pages often need manual cleanup after export. EPUB is even less forgiving, since it reacts badly to style drift, image behavior, and any page-based assumption that does not translate into reflowable text.
That is the point where it helps to compare your workflow with a platform built for book production, as shown in this Word versus Storyloft guide. Word can draft the manuscript and produce a workable export. Storyloft keeps drafting, editing, illustration, cover design, and export in one place, which matters once the file starts needing more than document formatting.
If the layout depends on exact visual placement, test it twice. Once on screen, once after export.
The video below gives another walkthrough of export habits and layout checks.
When Word Stops Being Enough and a Platform Like Storyloft Helps
Know the pressure points
Word can take you from draft to printable manuscript, but it starts to fray when the project needs more than document formatting. Style drift creeps in over long files. Cover design lives elsewhere. Illustration work usually means another app. Research notes and manuscript text end up in different windows, and that constant switching slows the process down.
That doesn't make Word wrong. It just means Word is strongest when the book is mostly text and the layout is relatively straightforward. Once the manuscript grows into a larger system, the friction usually shows up in editing, design, and export.
Match the task to the tool
Here's the cleanest way to think about it.
- Word handles drafting and basic structure. That includes chapter setup, page numbering rules, and simple print formatting.
- Word handles basic proofreading. The desktop Editor pane gives you spelling, grammar, and readability support inside the same environment Microsoft Word readability guidance.
- Storyloft handles the same book workflow in one place. It combines drafting, AI-assisted editing, illustration, cover design, and print-ready plus ebook export in a single application, and it can import Word documents into its workspace.
That last point matters when you've already started in Word and don't want to rebuild the whole book from scratch. Storyloft also gives authors a manuscript editor, planning workspace, and formatting tools designed for long-form book projects. For writers weighing a move between tools, the comparison at writing novel Microsoft Word vs Storyloft is a useful reference point.
Decide based on your project, not the hype
If you want full control over every formatting detail and your book is short enough to manage manually, Word is a solid starting point. If you want one environment for drafting, editing, illustrations, cover design, and export, Storyloft reduces the number of round trips between tools. The difference isn't about ambition, it's about how much hand setup you want to own.
For a lot of first-time authors, the right path is simple. Use Word when you're comfortable with menus and want to build the manuscript yourself. Use Storyloft when you'd rather keep the book, the design, and the export workflow inside one workspace.
If you want a single workspace that keeps drafting, editing, book formatting, and export together, try Storyloft and compare it against your current Word workflow. It's built for authors who want manuscript structure, cover design, and publishing tools in one place without stitching together separate apps.