Editing a Draft Workflow with Storyloft Tools
You've got a messy draft open, ten tabs of notes scattered across your desk, and the same three questions looping in your head. What needs to move, what needs to be cut, and what can wait until later? That's the point where editing a draft stops being a vague cleanup task and becomes a workflow, one that keeps structure, prose, and proofreading from colliding into the same exhausting pass.
A disciplined revision process is easier to trust when you treat it like a sequence of decisions, not a single heroic session. Harvard Library's drafting guide recommends reading paragraph by paragraph, making an outline entry for each paragraph, and marking corresponding changes before editing begins, while UNC's revising guide recommends a printed copy, reading aloud, and limiting yourself to a few goals per draft (Harvard Library drafting guide). If you want to manage that kind of moving target with less tool switching, resources on managing AI workflows effectively are worth a look, because the same discipline applies whether you're revising manually or with software support.
Table of Contents
- Introduction to Editing a Draft Workflow
- Preparing Your Manuscript for Revision
- Conducting Structural Editing Pass
- Performing Scene and Line Level Edits
- Using Checklists for Copyediting and Proofreading
- Managing Revision Cycles and Collaboration
- Streamlining Edits with Storyloft Tools
Introduction to Editing a Draft Workflow
A draft can look busy and still be badly organized. A writer spots a weak paragraph, rewrites a few lines, then shifts to punctuation and word choice before the larger problems are clear. That feels like progress, but it often leaves the draft's real weaknesses untouched.
Revision works better as a sequence of passes. Separate structure, scene-level clarity, and final polish so each round has a clear job. Harvard Library describes editing as a formal, multi-step process that keeps story-level revision apart from sentence-level polishing, which helps reduce missed issues and mental overload (Harvard Library drafting guide). For authors working across notes, comments, and AI-assisted suggestions, the same logic also supports managing AI workflows effectively without losing track of what changed or why.
Practical rule: Do not fix lines until you know the draft's shape. If the order is off, line edits only make the wrong version look cleaner.
That approach applies to novels, essays, and research-heavy manuscripts alike. Drafts usually contain solid material in the wrong order, sections that need more development, and transitions that only make sense to the original writer. A revision workflow gives you a way to sort those problems instead of treating every issue as a sentence-level problem.
It also helps to know how the draft will be handled once revisions start. If you are moving between print and digital review, or setting up manuscript files for comments and clean copies, Storyloft's manuscript formatting guide can keep the process organized before the deeper edits begin.
Preparing Your Manuscript for Revision
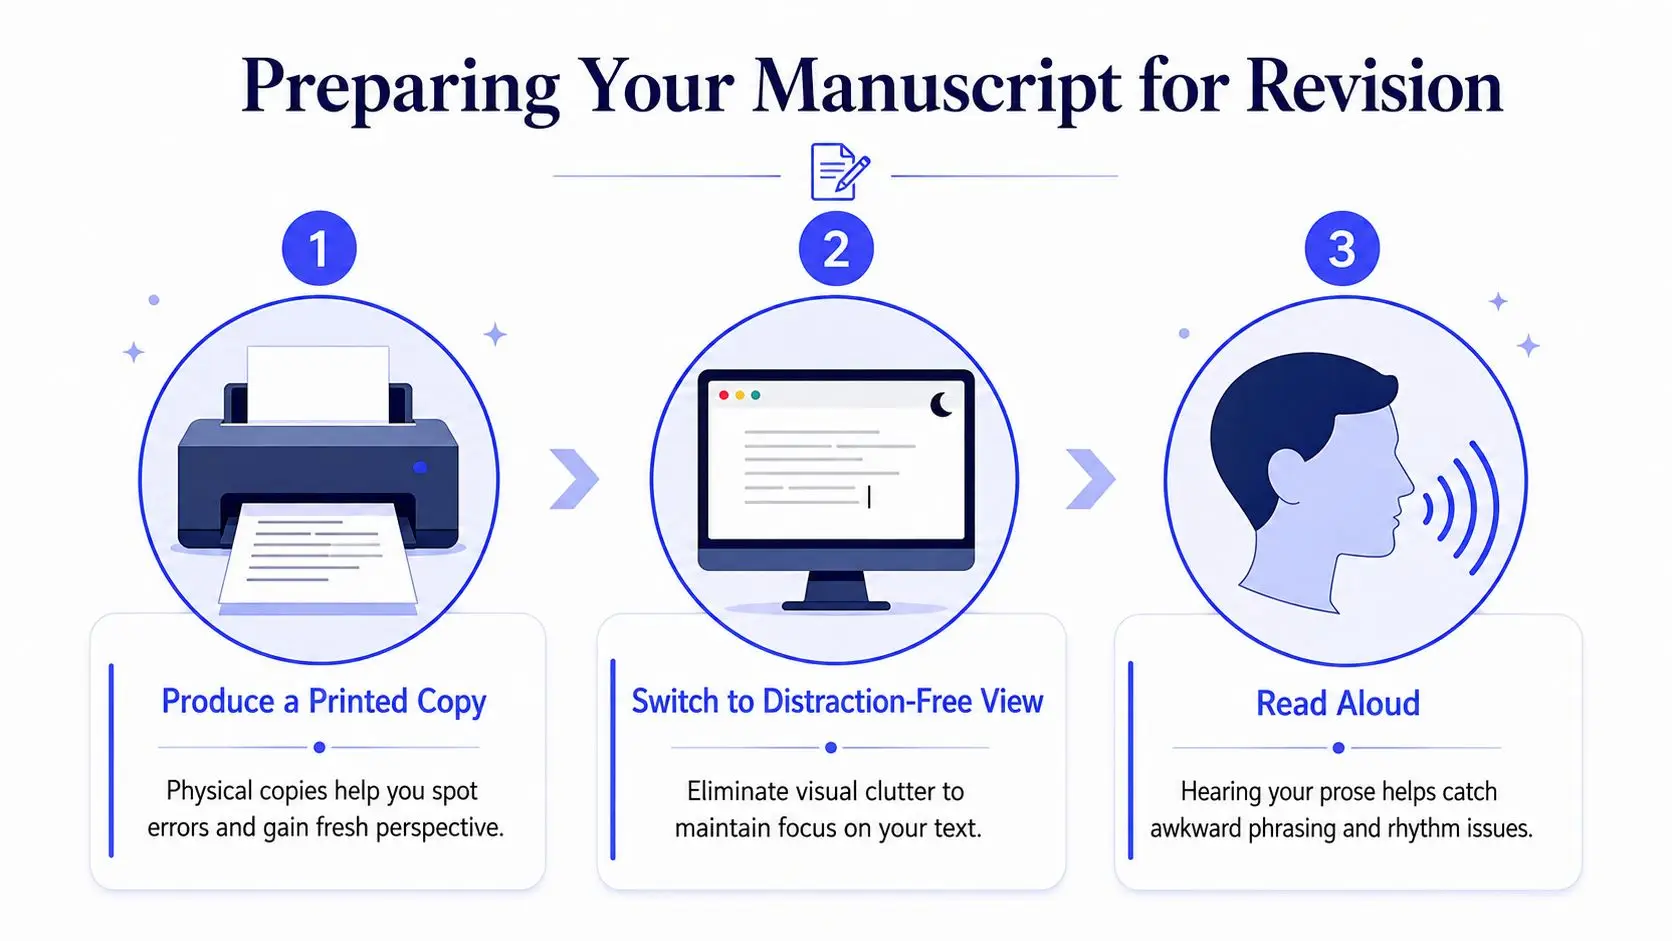
A draft reads differently once you change the surface. Print it, or switch to a distraction-free view that clears away notifications, toolbars, and half-finished notes. Reading aloud and using a printed copy or altered visual format often exposes errors that screen reading hides, especially when you are too familiar with the text to notice what is missing.
Set up a revision surface that shows problems
Start with broad notes on the hard copy. Circle places where the pacing drags, underline sections that repeat information, and mark any paragraph that feels out of place without trying to fix it yet. If you work in a digital draft, keep short notes in the side panel so you can capture reactions without breaking your reading rhythm. The goal is to collect observations before you begin editing the prose itself.
A short reverse outline helps here as well. Write one line for each paragraph or section, then note the purpose of that unit in the margin or in your notes. That simple map makes it easier to spot where the draft spends too long on one idea, skips over another, or moves too quickly between topics. The same approach fits the practical advice in Storyloft's guide on manuscript formatting, because a clear setup makes it easier to tell whether a problem comes from the draft or from the way it is displayed.
Read aloud before you touch the prose. Awkward rhythm, missing words, and repeated phrasing often show up in your ear before they show up in your eyes.
A clean format also keeps the revision process from getting tangled in file clutter. Use one version for notes, one for clean reading, and one for later edits if you need to separate review stages. That small bit of discipline saves time once the manuscript starts getting marked up in earnest.
Conducting Structural Editing Pass
Structural editing starts with a full read-through before you change anything. That sounds slow, but it prevents you from fixing one paragraph and accidentally creating a new problem three pages later. A high-reliability workflow is to read the whole draft, then build a reverse outline so you can see gaps, weak transitions, and redundant sections before line editing starts (Friction Lit).
Read first, then map the draft
On the first pass, don't annotate every sentence. Track what each section is doing, where the tension rises or falls, and where the draft starts to repeat itself. Once the reverse outline is done, you can judge whether chapters, scenes, or sections are in the right order and whether any section should be merged, split, or removed.
That's where structural editing becomes practical rather than abstract. If two adjacent chapters deliver the same information, combine them. If one section tries to cover too many beats, split it so each part can do one job well. If a key point appears too late, move it forward. This is the level where pacing and reader attention are won or lost.
The same principle applies in nonfiction. A chapter that opens with background, shifts to examples, then jumps back to definitions can feel disjointed even when each individual paragraph is clean. A reverse outline exposes that problem immediately because it turns the draft into a sequence of functions instead of a wall of text. If you organize source notes, character details, or research in one place, the workflow in how to organize characters, worldbuilding, and research without leaving your manuscript can keep those references close while you reassess structure.
Decide what belongs where
A draft usually improves fastest when you ask three questions about every section.
- Does this section advance the main point? If it doesn't, cut or relocate it.
- Does this section earn its length? If the same idea appears in multiple places, compress it.
- Does this transition feel earned? If the connection is forced, add the bridge or move the material.
Structural editing rule: If a section only exists to preserve something you personally liked, it may not deserve a place in the final draft.
This pass is also where you check whether the draft has enough detail to satisfy readers' curiosity. Too little context leaves them lost, but too much slows momentum. The right balance usually becomes obvious once the outline shows which sections are carrying the work and which are just taking up space. Save sentence-level cleanup for later, because polishing the wrong structure only makes revision harder.
Performing Scene and Line Level Edits
Once the structure holds together, shift to scene work and line work in separate sweeps. Keeping those passes separate lowers mental strain and makes it easier to spot problems that disappear when you try to fix everything at once. Scene clarity and sentence smoothness affect each other, but they are still different jobs, and they need different kinds of attention.
Tighten the scene before polishing the prose
At the scene level, check whether the action lands cleanly. A scene should have a clear purpose, whether that is advancing the plot, revealing character, or answering a question the reader now cares about. If the viewpoint drifts, the dialogue stalls, or the scene ends without moving the draft forward, revise the scene before you worry about wording.
A useful comparison is this kind of change:
- Before: The character explains the argument twice, then returns to the same emotional beat.
- After: The argument appears once, the emotional beat lands once, and the scene ends with a sharper turn.
That is not just shorter, it is cleaner. The scene stops repeating itself and starts doing more work per paragraph. Dialogue deserves the same treatment, and if you need a focused reference point, how to write better dialogue is a useful companion when you are checking whether speech sounds natural and purposeful.
Polish the line without flattening the voice
Line editing should sharpen clarity without sanding away the author's voice. Cut filler words, simplify tangled sentences, and tighten dialogue tags where they start to draw attention to themselves. If a sentence works on the page but trips you when you read it aloud, that usually means it needs revision.
A few line-level checks make the pass more reliable:
- Sentence rhythm: Vary sentence length so the prose does not feel mechanical.
- Word choice: Replace vague terms with words that do real work.
- Paragraph flow: Keep each paragraph focused on one idea or movement.
- Repeated phrasing: Search for words or structures you reuse too often.
Storyloft can fit naturally here as one option for keeping comments, edits, and revision history tied to the manuscript itself, especially when you want to compare versions without hunting through separate files. That matters because revision slows down when every note has to travel through a different app. The point is not that software replaces judgment, it is that a tighter workflow leaves more attention for the actual edit.
Using Checklists for Copyediting and Proofreading
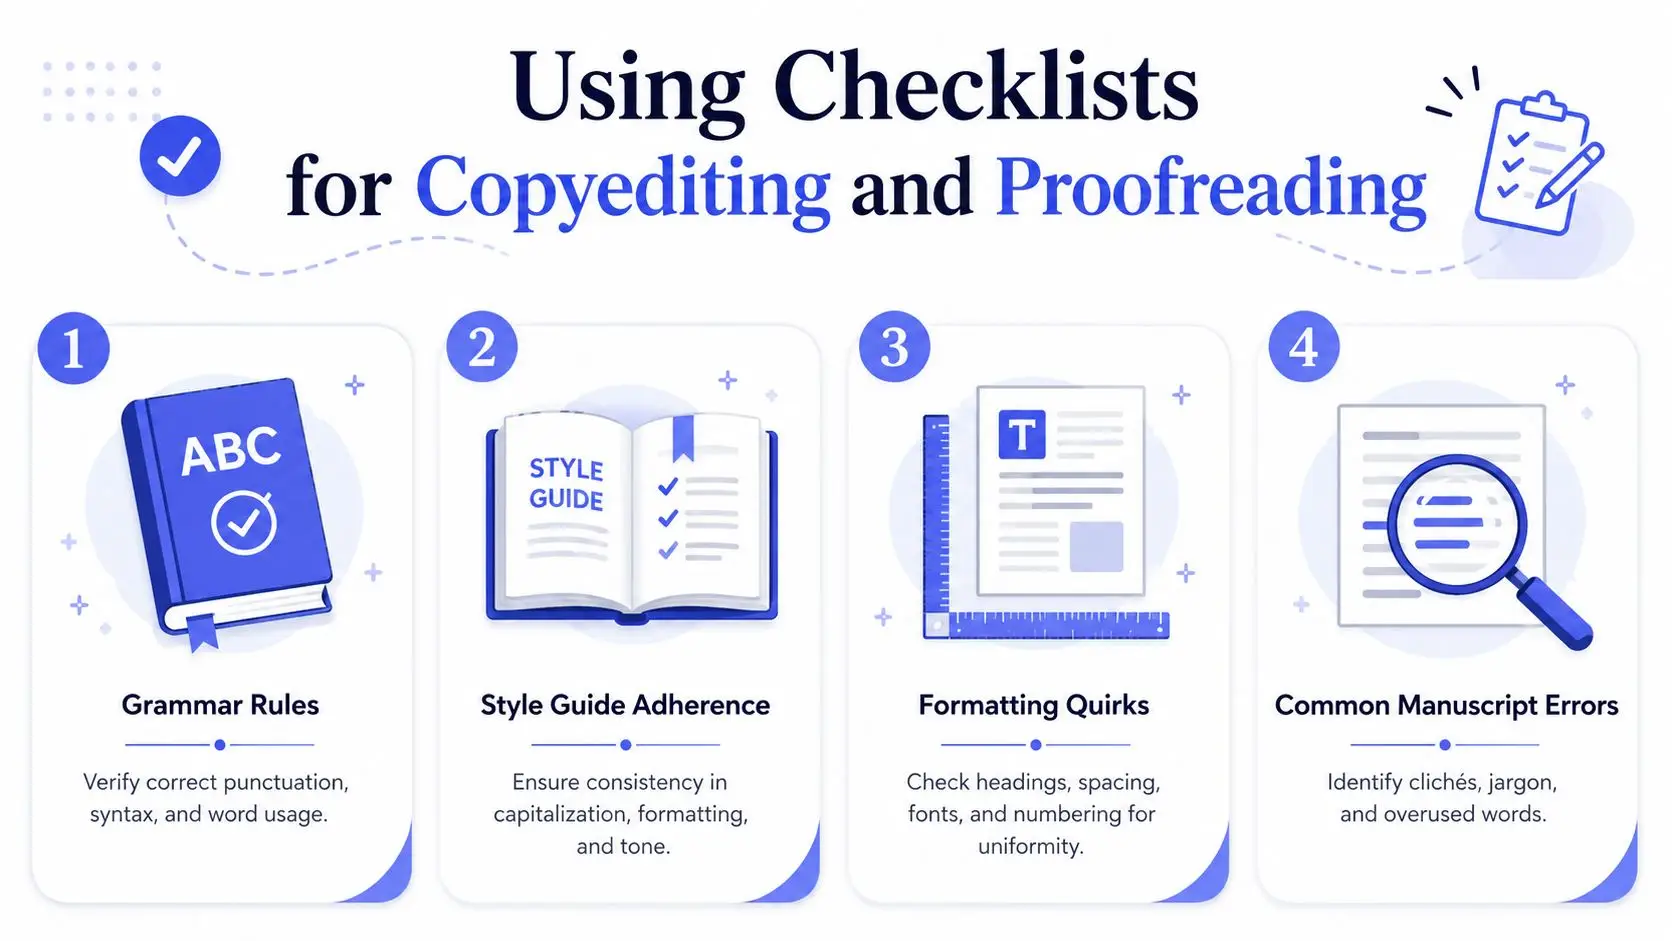
Copyediting and proofreading work best when they stay narrow. At this stage, you are not reworking structure or rethinking scenes. You are checking consistency, grammar, spelling, formatting, and the small errors that survive earlier passes. A checklist keeps that work disciplined, especially when you need to compare the draft against notes, style rules, or a second set of eyes. That same habit also fits well with tools that streamline document collaboration for AI, because the checklist and the comments stay tied to the manuscript instead of scattered across separate files.
Use a final-pass checklist
A good checklist keeps the last pass focused. It should cover names, numbers, punctuation, capitalization, repeated phrases, and formatting quirks that are easy to miss once you know the draft too well. If the manuscript depends on research, verify names and references against your source notes, not memory. Use the checklist to separate real errors from the false confidence that comes from reading the same pages too many times.
A practical final pass usually covers these areas:
- Grammar and punctuation: Check sentence endings, apostrophes, and comma usage.
- Consistency: Confirm character names, place names, terms, and capitalization stay uniform.
- Formatting: Review headings, spacing, italics, and numbering.
- Common slip points: Look for repeated words, skipped words, and accidental duplicates.
A printed checklist slows you down enough to notice what the eye usually skips. If you work inside a task panel or notes system, turn each item into a separate task so you can mark it complete without reopening the entire manuscript for every minor issue. That turns proofreading into a controlled audit rather than a vague final glance. It also helps when Storyloft is part of the workflow, because comments, edits, and revision history remain in one place while you move through the list.
Know what to look for in the last read
The final proofread should stay narrow. If a paragraph still needs rewriting, note it and keep moving. Reopening major edits at this stage can pull you back into an earlier revision cycle and blur the line between copyediting and development. The goal is to catch the small, expensive mistakes, not restart the manuscript.
Read aloud again during this pass if the prose still feels stiff. That habit catches awkward pacing and missing words quickly, especially after you have looked at the page so many times that visual familiarity starts to hide errors. It also helps expose places where a sentence technically works but still reads as if it were assembled too quickly. A careful final read gives you one last chance to separate true polish from surface neatness.
Managing Revision Cycles and Collaboration
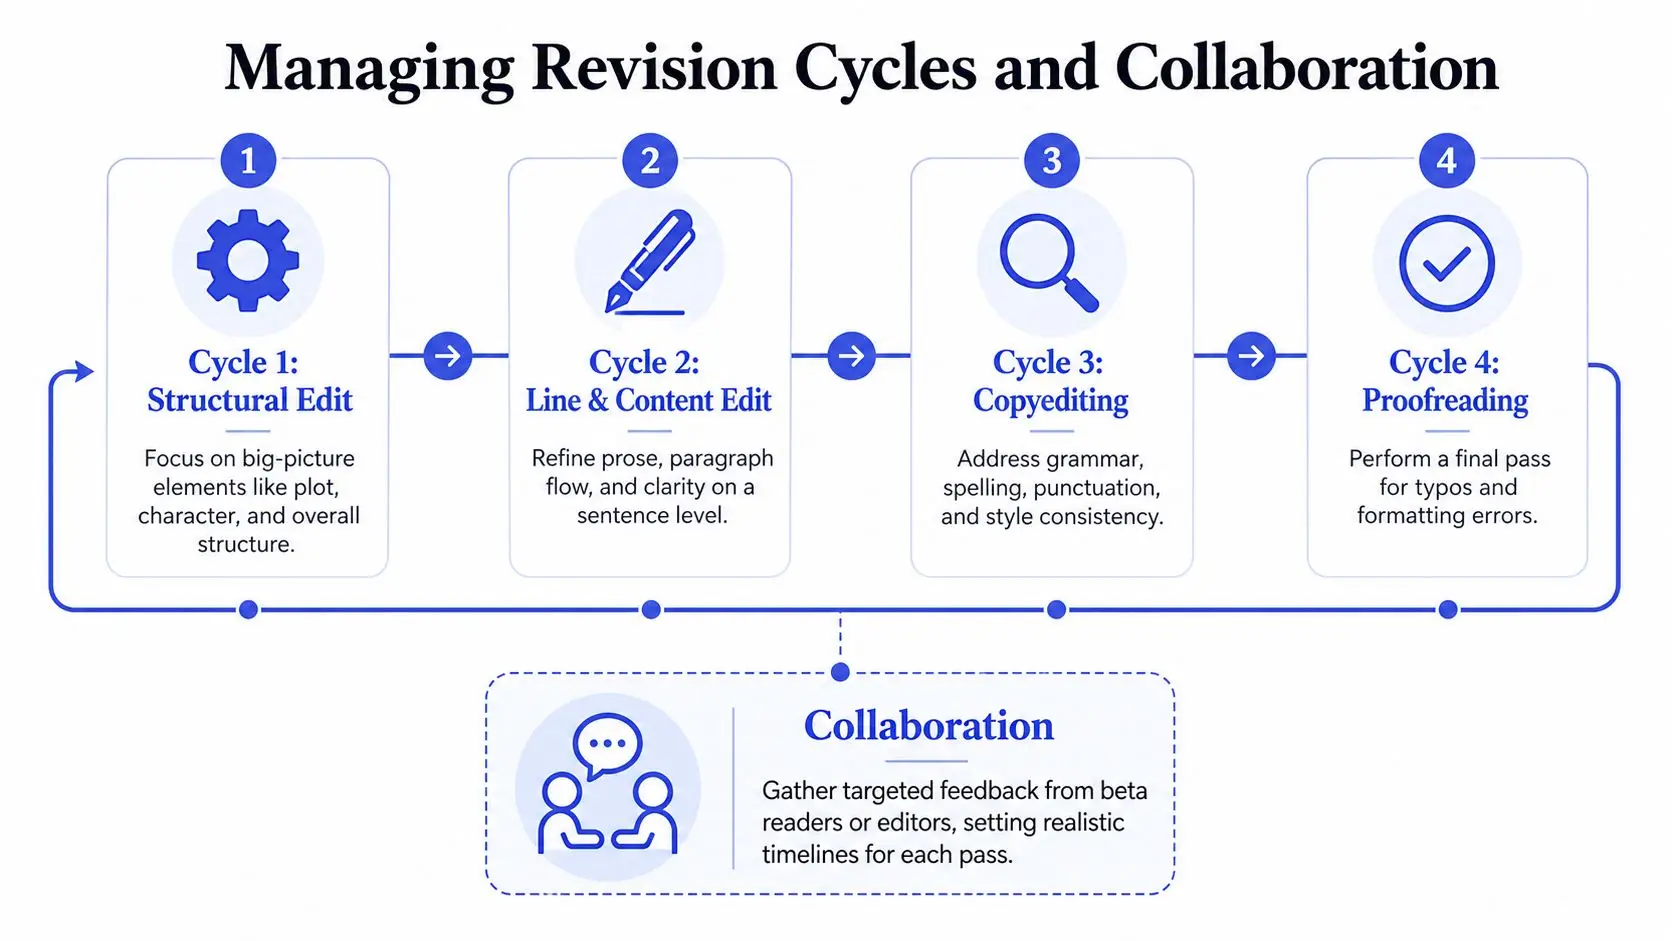
Revision works best when you plan for more than one pass. A clean editorial cycle usually moves from structure to line work to copyediting to proofreading, with focused feedback added between stages. That order keeps collaboration usable, because each reviewer can respond to the level of change that matters at that point instead of reacting to every issue at once.
Keep feedback focused and timed
The biggest mistake in collaboration is asking too many people for too much at once. Beta readers, co-authors, and editors are more useful when they get a narrow question and a specific excerpt, not the whole manuscript dropped on them in one pass.
If you're sending material to a beta reader, keep the request limited to a small section and a clear purpose. That keeps the response tied to a real decision instead of a general reaction to the entire draft. It also makes it easier to separate useful notes from preferences that do not affect the manuscript's direction.
A simple timeline helps when several people are involved. One reviewer can handle structure, another can focus on clarity, and a later pass can handle copyediting and proofing. That division keeps comments from colliding, since each note sits inside a stage rather than competing as a broad opinion.
If your team is working in markdown or shared documents, the resource on streamline document collaboration for AI is useful for setting up roles, comments, and version flow in a cleaner collaborative process. The point is to keep feedback visible without letting it fragment the draft.
Treat second eyes as validation, not authority
A second pass often catches what the first pass misses. In research-heavy or fact-heavy drafts, that extra read matters because writers become blind to their own assumptions and repeated patterns.
A strong review process also includes comparison against outside material and a check for consistency before the draft moves on. That kind of validation is most useful when you are confirming accuracy, not reopening the whole piece for another round of development. It catches mismatches, weak support, and places where the draft has drifted from earlier decisions.
That does not mean every comment gets accepted. Compare suggestions, judge them by impact, and revise with intent. When two readers disagree, return to the manuscript and ask which change improves the reader's experience, not which comment sounds more forceful.
Storyloft's editorial feedback notes can help here, because they keep comments and revision history connected to the draft. The guidance on Eddy editorial feedback is a useful reference when you want to see how targeted feedback appears inside a project.
Streamlining Edits with Storyloft Tools
The practical advantage of an all-in-one writing environment is simple. You spend less time moving content between tools and more time deciding what the manuscript needs. Storyloft combines manuscript drafting, AI-assisted editing, comments, edit history, and export tools in one place, so the revision workflow stays attached to the draft instead of spreading across separate apps.

Match the tool to the revision stage
Use the manuscript editor when you're still shaping the draft, then move to comments and edit history when you want to track what changed and why. Eddy, Storyloft's AI assistant, can help with targeted rewrites inside the document, which is useful when a scene needs a tighter version, a clearer transition, or a cleaner line without forcing you to copy text into another application. The knowledge base page on Eddy editorial feedback is a good reference point when you want to understand how that kind of feedback is surfaced inside the project.
Binders and tags fit naturally into the earlier research and structure stages. Keep source notes, chapter ideas, and character details in the same project so you're not breaking concentration every time you need to verify a fact or check a continuity point. That matters because revision is already cognitively expensive, and every extra app adds another layer of context switching.
Use collaboration features to preserve momentum
Comments and version history are useful when multiple people touch the same draft. You can collect notes, compare changes, and keep the manuscript from becoming a maze of conflicting file names. If you're sending sections to beta readers or an editor, that setup makes it easier to separate structural feedback from line notes and then decide what belongs in the next revision round.
The YouTube walkthrough below gives you a quick visual sense of how the editor environment works in practice.
Export presets matter at the end because proofing copies should look different from working drafts. Once your edits are locked in, generating a clean version for a final read-through helps you catch the mistakes that only show up in a formatted view. If you're comparing tools for that part of the process, the broader feature comparison in Viral.new's editor comparison is a useful reminder to look at how editing environments handle feedback, collaboration, and version control rather than just the surface interface.
A workable habit is to keep each revision cycle in one project, one place, and one sequence. The manuscript stays central, the notes stay attached, and the final proofing copy comes out only after the earlier decisions are settled. That's how revision stops feeling like cleanup and starts feeling like controlled production.
If you're ready to make editing less chaotic and more repeatable, set up your next draft in Storyloft, keep the manuscript, comments, and revision history in one workspace, and run your next pass with the structure already in place.